Wednesday, May 30, 2012

Day 70: We Have Edibles!

After five great days vacationing with family in Texas, we're back home to find deliciously sweet and tender snap peas! The plants struggled a bit in the heat while we were away, but pea pods are a-hanging, and blossoms are abundant. I was looking forward to making some stir-fry meals with the snap peas, but I don't think we'll be able to resist them in their raw form right off of the plant. So good.


How is everything else doing? Some really great, some just okay ... of course, given the return of early heat here in Michigan, the insects are running rampant. You can see their effect on the Brussels, broccoli, kale, and cabbage. The white seen on the leaves and in the mulch below is ordinary white flour -- reportedly, cabbage worms eat the flour, bloat, and die. We'll see if it works.


We have baby fruit on the tomato plants (this particular variety is the yellow pear tomato), and blossoms on nearly every pepper plant.


The heirloom tomato and pepper plants that I started from seed are slow to grow, so I have yet to transplant them into the ground. They will likely end up in pots on the patio. The varieties pictured here are heirlooms from a local farm.


I also picked up some cucumber and broccoli plants from a local farmer, and these plants are THRIVING in the heat. I planted marigolds throughout my veggie beds as they are said to help with nematode and aphid problems.


I love the cucumber plant's curly-cue tendrils -- if you watch for long enough, you can practically see them growing in front of your eyes.


The lettuces in the window boxes are growing strong--they really love their east-facing spot, thankfully. The green shoots emerging from the soil to the left of the lettuce below are Parisian Market Carrots, a chunky, round variety that should grow well in the shallow soil depth of the window box. 


And all of my herbs are thriving. I have two kinds of basil, rosemary, and some coleus (mixed in for color) in one pot, and a tall plant stand that holds mint, parsley, and cilantro.


I really dig the plant stand, which is from Crate and Barrel. It allows me to stack these herbs vertically (remember that I have very little patio and yard space). It also lets me easily swap out or move around plants from this stand to adjust for shade/sun.


As my garden grows, I am beginning to think of new dishes to cook using these plants. Tonight I made grilled chicken and yellow squash, and worked in the parsley and cilantro, as well as my many-year-old chives that originally came from my mother. Do you have favorite recipes that feature any or many of the ingredients in my garden? Pass them along, please!


"Shall I not have intelligence with the earth?
Am I not partly leaves and vegetable mould myself?"
--Henry David Thoreau


Tuesday, May 29, 2012

It's an Urban Garden Bug Bash

Apparently a broadcast bug bulletin went out last week: "Come one, come all ... beetles and bees, wormies and wasps, aphids and mites! There's a new party house in Royal Oak. Open 24 hours!"

I knew this would come--I figured that the time was nigh for my garden to come under attack. The yellowjacket wasp is still sharing space with the carpenter bees, who are busy protecting their little round spaces of homes in my garage eaves (although I've been gently living with them without a sting thus far). The cabbage moths are back and flitting about, and a few cabbage loopers have been found and treated with white flour...these, especially, will be watched carefully in the coming days.

Lady Beetle larvae
On the beneficial bug side, I've found Lady Beetle larvae among my brassicas--I've learned that they are a main predator of the aphid and cabbage worm. Hiya! You gals can stay.

Also, from my local farmers' market, I purchased an egg case filled with up to 200 Praying Mantids, which should hatch this month. Praying Mantids have a voracious appetite for all kinds of insects, including aphids, moths, mosquitos, and flies. Come on out, little ones, my garden needs you.


What I was NOT prepared for was my body to be attacked. Squeamish readers won't like this part ... a week ago today, after a long, hot day of digging deep into the soil bed along my back fence, I started to notice itchy bites on my skin. As time went by back in the house, the bites seemed to multiply. I didn't feel any stings, I didn't see any crawlies, but a few hours after coming indoors, hot welts were developing all over my back, neck, and legs, as well as some under my arms, near my sensitive girlie armpits, and along my bra line. I stopped counting at 130 bites overall. There were more than 30 on one thigh alone, which caused general swelling of the entire area, about the size of my hand. What the ...?!

After a lot of research, I surmised that it was very likely the workings of the chigger mite, a nearly microscopic, round, reddish dude, who moves fast and runs in packs. The chigger is not an insect but an arachnid, related to spiders and scorpions. Let's all say it together now: "Ewww!"

Microscopic view of a chigger mite
Chigger mites attach themselves to a host (like, um, ME, for instance) and inject a digestive enzyme that breaks down body tissues. Chiggers then feed on that liquefied tissue. Mmm-mmm. Thankfully, these guys in the United States don't carry any known diseases, and they don't infest homes. Not so thankfully, they got me, but good. For four to five days, I was a walking itch, inflamed and incensed. The swelling and itching calmed down fairly quickly after that point, even though after a week I still look like a dirty kid with scabies.

Cortisone spray, vaseline, and ibuprofen helped tremendously those first few days. I also tried clear nail polish and raw honey on the welts, but that really just made me feel stinky and sticky.

What can I say but LESSON LEARNED! I do not need to become one with my soil. There is no need to crawl in it, to practically bathe in it, to get the garden work done. And from now on, I will forget about the capris and sockless garden clogs. When working in the back beds, I need to COVER UP for goshsakes with a long shirt, tall socks, and my knee-high Wellingtons, even in my small yard. And I'll try the Burt's Bees or Skin-so-Soft treatments before going out.

I hate to say it, but the Bug Bash isn't even fully amped up yet, as June Bug, Japanese Beetle, and Mosquito season is still around the corner.

Sources:

"Chiggers!" MDC Online, Missouri Department of Conservation, http://mdc.mo.gov/discover-nature/avoid-outdoor-pests/chiggers.

"Chiggers - Mites That Bite!" Living with Bugs,  http://www.livingwithbugs.com/chigger.html.

Cranshaw, W.S., "Lady Beetles," Colorado State University Extension, http://www.ext.colostate.edu/pubs/insect/05594.html.

"Eight Interesting Facts About Aphids and Suggestions for Control," Karen's Garden Tips, http://www.karensgardentips.com/growing-garden-plants/garden-pests-diseases/eight-interesting-facts-about-aphids-and-suggestions-for-control/.

Hamir, Arzeena, "Using the Praying Mantis in Your Garden," http://www.gardenguides.com/840-using-praying-mantis-garden-garden-pest-tip.html.

Smith, Jennifer, "Chiggers: Fact and Fiction," LJWorld.com, http://www2.ljworld.com/news/2008/aug/21/chiggers_fact_and_fiction/.

Thursday, May 17, 2012

Wood-Boring Bees!

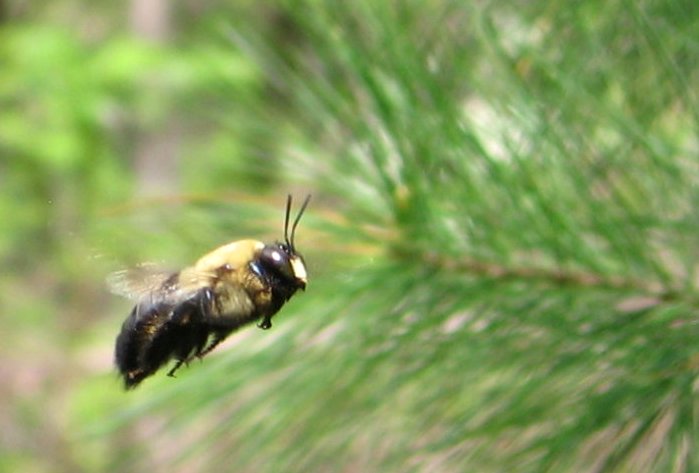
Bumblees are fascinating creatures. Their amazingly loud buzz and way of hovering is something out of a science fiction movie. I was enjoying a small group of them in my yard (from a distance) until I needed to work in their area (up close), and I started to notice some strange behavior around the eaves of my garage.

Turns out what I have in my yard are not actually bumblebees but carpenter bees. Their shiny abdomens set them apart from bumblebees, which are completely covered in dense hair. Carpenter bees use their mandibles to bore holes in wood, where Miss Queen Bee lays her eggs.


I recall seeing one guy buzzing around the entire garage for a few days. I've learned that he was likely a scout bee, looking for just the right spot for his Queen to lay her eggs. More bees came. They would chase and tangle up with each other, dive bomb me, and then repeatedly return to hang out under the eaves. Research tells me they were anxiously waiting for the arrival of Her Highness.

Perfectly round holes in the eaves of my garage, compliments of the carpenter bee.

I believe that She has now arrived. The trumpets have sounded. Yesterday, the frenetic buzzing about moslty  settled down, so I took a closer look-see. What I found are 1/2-inch holes in my wood (no drill bit used here). Carpenter bees tend to do this in sheltered areas, and into bare, unprotected wood. How gracious of us--we've provided just that for them.

The question now is: Can I live peacefully with these guys? The males, though aggressive in their protection of their territory, cannot sting. Females rarely do, unless provoked. Males have white or white faces, and females have black faces (I need to remember that). They are phenomenal pollinators, and I will need that in the coming weeks. I'll be planting watermelon, cabbage, Brussels, and kale in this area.

More bee holes, above planting beds 2 and 3.

But what about the damage to my garage? Are the bees done boring for the season? If so, perhaps I'll let them be for now, and treat the wood in the fall, hoping they find somewhere else to nest. Reportedly, rubbing or spraying almond oil on the bare wood detracts them. I've also read that the holes can be filled with a small ball of foil and caulked. Do you have any other, chemical-free suggestions?

I'm heading out now to work the soil directly under this area. Black-faced Queen Bee, oh hear me: Please keep your distance. I greatly respect you, I do, and your stinger bee butt.

Wednesday, May 16, 2012

Day 58: Getting the Heck Out of the House

It's been nearly 60 days since my first heirloom seeds went into soil, and I'm tickled to see this day. I've mixed potting soil, sowed seeds, watered, done the daily find-the-sun dance, sang the snappy "grow-plant-grow" ditty about a zillion times, plucked out my seedlings, and prepped my beds.

Seedlings toward the end of April, gathered at a south-facing window for Grandma to plant-sit while we're out of town.

The day to put the seedlings in the soil outdoors, under the sun and moon, 24-7, is here. The seedlings have been hardened off, or have spent increasingly more time outdoors to get acclimated to their new environment. In the ground as of this hour are tomatoes, peppers, onions, and lettuce. And I also direct-seeded spinach and carrots today.

Brand new transplants of onions and tomatoes, with their favorite companion flower, the marigold. The twine marks the line where carrot seeds were sowed.

The snap peas are reaching for the sky and beginning to move beyond the trellis in the pot to the larger trellis on the patio. In a few more weeks, if all goes well, we should see blossoms.

Amish Snap Peas, 41 days after sowing seeds.

The Sugar Baby Watermelon plants are happy. Their outdoor beds and climbing structures are almost ready. Another day or two, and they'll be in the ground.

Sugar Baby Watermelon, 41 days after sowing seeds.

Filderkraut Cabbage is good--and I'm happy to report that there is no sign of cabbage moths or worms! The kale is slower, but is coming along nicely. Red Cabbage and Brussels Sprouts still need a few weeks to mature.

Filderkraut Cabbage, 56 days after sowing seeds, crowding each other and ready for transplanting.

Lacinato Kale, 57 days after sowing seeds. Slower growth than expected, but growing just fine.

Lettuce and Parisian Market Carrots (those small, round guys) are in my east-facing window box. I hope they'll get enough sun. I'm temporarily reserving space in my two south-facing window boxes if they don't work well here in the east.

A blend of lettuces in an east-facing window box. Also planted here are Parisian Market Carrot seeds.

Also, I continue to share seedlings. To date, friends and family members have taken about 1/4 of what I've grown. I still have a good amount left that I won't be able to accomodate in my yard--what to do with them? Two more weeks, and most everything will need a home.

Friday, May 4, 2012

Following Up on The Very Hungry Caterpillar

Good news! The Very Hungry Caterpillars are nowhere to be found. In total over a three-day period, I found seven of what I learned were cabbage worms happily noshing away at my cabbage and Brussels sprouts seedlings. Since picking the worms off and taking steps to avoid moths from laying their eggs on my plants to start with (I covered the pots with an old lace scarf thingie that my daughter had in her dress-up trunk), not a one has been found.

The Cabbage Moth lays its eggs on the underside of leaves.
In its larval (caterpillar) stage, this guy chomps right through your cabbage, Brussels, and broccoli plants.
In addition to the brown dude pictured, there is a white variety (white with black spots on its wings).

Thinning and repotting the plants likely helped as well, as did making a scene by throwing the first worm out to the birds while yelling and swearing. Surely the word on Worm Street is to NOT eat at the Urban Heirlooms Project salad bar ... at this time, anyway. We'll see what happens once the plants go in the ground for the season.

And Then There Were Many

"One for the rock, one for the crow,
One to die, and one to grow."
- English saying
Heck, I have enough seedlings for the rock, the crow, and for the entire neighorhood to grow. My mother has always recommended "everything in moderation," but I've always been a bit of a rebel.

This past week I've been thinning out my little seedlings, getting many into larger pots of their own. And what I've realized? I sowed a BOAT LOAD of seeds! A good majority of them have germinated (see below), which, hey, kudos to Annie's for sending healthy seeds, and to myself for providing them the right conditions for success. They've now taken over my house ... which is good and bad.

I've quite liked caring for my heirloom seedlings. I move them around to find sunshine each day, take them outside on nice days, bring them back in, water them, gaze at and admire them ... I nurture them. I'd rather have a new baby (okay, that's a ridiculous understatement) or a puppy, or both, but for now this will have to do. The bad is that they've taken over my house. I'm beginning to tire of the indoor follow-the-sunshine dance, and the daily vacuuming of the small remnants of soil found on windowsills and floors. I'm now officially ready to get them outside and into the ground. Another week or two are needed yet, I know, so I'm practicing patience.


So how many seedlings do I actually have?
  • Filderkraut Cabbage: sowed 180 seeds; 146 seeds germinated (81% success rate)
  • Red Rock Cabbage: sowed 150 seeds; 120 seeds germinated (80% success rate)
  • Long Island Brussels Sprouts: sowed 200 seeds; 174 seeds germinated (87% success rate)
  • Lacinato Kale: sowed 100 seeds; 97 seeds germinted (97% success rate)
  • King of the North Bell Pepper: sowed 25 seeds; 25 seeds germinated (100% success rate)
  • Bianco di Maggio Onion: sowed 100 seeds; 95 seeds germinated (95% success rate)
  • Sugar Baby Watermelon: sowed 25 seeds; 21 seeds germinated (84% success rate)
  • Lettuce blend: sowed 100 seeds; these are hard to measure, but they are growing like mad (I'll call them 100% successful)
  • Amish Snap Peas: sowed 80 seeds; 80 seeds germinated (100% success rate)
That makes 858 individual seedlings...so far. I haven't even begun to direct-seed my carrots, spinach, kohlrabi, and herbs yet. Zoinks! Have I mentioned how small my yard is?


Then there are my tomatoes...these haven't had as much success. I believe this was my fault, though. I'll post separately about that.

In the meantime, it's due time to start sharing the many.

Wednesday, April 25, 2012

The Very Hungry Caterpillar


Lookie who I found, nicely disguised against my green cabbage plant. What the heck?! I had these plants outdoors for only a few hours this week. How did this guy hunt down my plants so quickly?


Research tells me that this is the bloody CABBAGE WORM! And he brought friends--I found three others so far. With nearly 200 cabbage seedlings in the works, this aint a good sign. Cripes. Caterpillars are cute in kids' books, but not so much on my heirloom plants.

OUT YOU GO ... to the birds! Before you're pecked to death, tell your friends to GETOUTTAMYYARD.


In the meantime, I understand that caterpillars loathe white flour. Upon eating it, they bloat and die. So our Cabbages and Brussels will get a flour dusting this week.

It's getting closer to outdoor transplant time ... I have a feeling that insects are soon to become my worst enemy. This means that it's also almost Jerry Baker tonic time. Do you have other natural bug control recommendations? 

Tuesday, April 24, 2012

The Sun Was Warm But the Wind Was Chill

Geez Louise, it's windy out! I know that wind is important, especially in the Spring--many plants rely on it to disperse their seeds. But wind is tough on vegetable plants, especially on new seedlings, so it's been a challenge to keep my plants healthy this week. The wind has been whipping about, tree branches falling all around, and after seeing my snap peas' twines get ripped from the trellises, I brought them inside.

I know, though, that pea plants love the cool weather, and they need at least 8 hours of sun. Keeping them indoors under a hot grow light wasn't doing them much good in the long run. I'm an admitted over-protective mother to my daughter, and now an effort is on to "toughen her up" ... a little. I want to do the right thing for my pea plants and not coddle them too much early on. So back outdoors they go--but not without a little wind protection. Bubble wrap comes to the rescue again! I placed the pots in a slightly sheltered but sunny area next to the house and created a simple wind shield with the bubble wrap. The wrap is not touching the plants.


I tried taking my more fragile and heat-loving seedlings outside for a while yesterday afternoon, but the wind started to sock them pretty good (they were wilting in less than an hour), so they'll stay snug indoors on their windowsills for another few weeks yet. Or at least until the wind dies down.

Filderkraut Cabbage on the first-floor sun ledge.


Sugar Baby Watermelon on the second-floor sill.

And just for kicks, a lovely pansy in my yard (photo taken by Mackenzie, age 9).

The sun was warm but the wind was chill
You know how it is with an April day
When the sun is out and the wind is still
You're one month on in the middle of May
--Robert Frost


Tuesday, April 17, 2012

Snappy-Growing Snap Peas

Vining plants amaze me...twining vines even more so. Never is it more evident that plants are *aLiVe*! 

The heirloom Amish Snap Peas seeds that I purchased from Annie's Heirloom Seeds develop into just that: a twining, vining plant, and so I was excited to get them going. I expected a lot, but I tell you, these guys caught me off-guard. They are developing incredibly quickly...I swear I see them growing before my eyes. The photos seen here were taken just 13 days after sowing seeds.


On April 4, I planted the seeds in two large pots. Nighttime temps were still dropping to the low-30s, so the pots were in the house except for the warmest hours of the day. Before taking them outside most days, the tops of the pots got a loose application of bubble wrap. Nine days after sowing, clumps of dirt were being pushed aside by green pea plants. The seeds had germinated. Two days after that, the plants were already reaching about three inches tall, and thin shoots were searching for something, anything to grip onto to get them closer to their almighty god and savior: the Sun.

The plan is for the plants to grow up the metal framing of a canopy that's on my brick patio. We'll see how that goes.


In the meantime, the pea plants' shoots are working up metal trellises that I placed in the pots just this morning. In fact, within an hour, the shoots seen above were fully gripping the trellis--so fast, it's creepy. It brings to mind Cleopatra, the fast-moving, man-eating plant on The Addams Family. I'll do everything in my power to ensure the health of this plant, but I'm going to watch my back around these fabulously vigorous, snappy-growing snap pea vines.

Thursday, April 12, 2012

DAY 24: April 12: Wide Open to the Sun

Look who is growing up big and strong? The cabbage, the Brussels sprouts, and nearly all of the heirloom seeds that we sowed indoors. Given the grey weather, it's been somewhat of a challenge to keep them warm and in good light (sun or grow lamp) each day, but I'd say we're succeeding. Aren't they cute?


They're starting to bump into each other. That, and the fact that some plants are starting to get their true leaves (their second set of leaves), means that they're about ready to be thinned out, or as some say, pricked out. The seedlings will be separated and placed in larger containers so they have room to better develop their roots in preparation for a final, outdoor transplant in May.


For now, I'm quietly enjoying the sight of them as they soak up the sun. And thank goodness for the sun today.


The windows of my soul I throw
Wide open to the sun 
-- John Greenleaf Whittier

Tuesday, April 10, 2012

Soil Science: I'm Neutral!

A successful garden needs nutrient-rich soil, not just a pile of dirt. Soil is a combined mixture of dirt, organic matter, and minerals. I could get overly scientific here--soil is complicated--but I won't. I only want to research and document enough to ensure that my own heirloom garden is healthy and fruitful.

It feels pretty terrific to get my hands in the soil this Spring. The stuff is magical. Soil is ever-changing, fertile, alive ... full of air and water and all kinds of natural STUFF. Forget cremation and burial vaults; when I die, I want my body to go straight into the ground so the roots and worms can return me to Mother Nature asap.

Breaking soil down to its most basic components:
  • Texture, or the size of soil particles. Soil with fine particles is known as sand, and on the other end of the spectrum is clay. Good soil texture should fall somewhere within the two. A good test for texture is to take a handful of soil and gently squeeze it. It should clump together. Upon squeezing harder, it should break apart easily.

  • Fertility, or the level of mineral nutrients in the soil. The three primary nutrients used by plants are nitrogen, potassium, and phosphorus. Funky things happen to plants that don't get a balance of these nutrients.

  • pH, or the measure of  acidity or alkalinity. This is probably the most important of the properties. Below is a generic pH scale. Plants typically grow fine at a level of about 6-7 pH, but some plants can be picky. Incorrect pH level can retard a plant's nutrient uptake, so if pH levels falls to the extreme, either way on the scale, hang up your overalls this season. Your soil will need some serious amending.

Upon investigating my soil, I feel confident that the texture is fine. I had successfully grown shrubs in this bed, so the mineral content is likely pretty good. But what about the pH? I know that I have to get this right for growing veggies. Thankfully, the Easter Bunny came to my aid this year with a digital pH reader in my basket.

It seemed like a perfect science experiment to bring my 4th Grader in on, so we both put on some garden gloves and spent late afternoon outside.

 Testing Our Soil's pH Level

1. We pushed aside the top few inches from our first planting bed and collected about two cups of the soil below, digging to a depth of 4-6 inches. We sifted the soil to remove rocks and debris.

2. We poured a little more than a cup of distilled water into the collected soil and stirred to create a nice, thick mud. (My gal loved this part, and wanted to make mud pies for dinner.)

3. We polished the pH Meter's probe, per manufacturer's instruction, pressed the "on" button, and gently pushed it into the mud, holding for 60 seconds. 7.0 pH. Repeated Step 3 in a separate spot in the mud. 7.0 pH.

  
A measurement of 7.0 pH means that my soil in this bed is smack-dab NEUTRAL, falling in the high end of the general range for positive plant growth. This is the bed in which I plan to cultivate heirloom tomatoes, though, and tomatoes do better with a lower pH level, more in the 6-6.5 range. 

Based on this reading, I'll do some amending, starting with some rich compost from my neighbor's yard and pine needle mulch gathered from my mother's mid-Michigan property. Both are said to lower soil pH. My other two main planting beds will be tested next.

I may decide to test the nutrients in my soil as well. Many states and universities offer soil tests for sale. You get the test kit, follow the proper instructions for gathering a soil sample, and send it to their lab for research. It takes a few weeks to get results. Michigan State University's Extension program offers kits for $20. You'll find more info here: http://www.css.msu.edu/SPNL/Faq.cfm

Sources:

Davis, Ph.D., Jessica, "How to Lower Your Soil pH," Organic Gardening, http://www.organicgardening.com/learn-and-grow/how-lower-your-soil-ph.

"Gardening in Michigan," Michigan State University Extension, http://migarden.msu.edu/migarden/soil.

Iannotti, Marie, "Amending Your Garden Soil - Making Good Soil Out of Bad," http://gardening.about.com/od/gardenprimer/a/Amending_Soil.htm.


"What Is Soil?" National Conservation Resources Service, U.S. Department of Agriculture,

Monday, April 9, 2012

Time to Make the Beds


"The best fertilizer for a piece of land is the footprints of its owner." -- Lyndon B. Johnson


More heirloom seedlings are up and smiling. Currently growing are Filderkraut Cabbage, Red Rock Cabbage, Long Island Improved Brussels Sprouts, and (just yesterday) my beloved Lacinato Kale.
The time for transplanting to the great outdoors is coming, and there's a lot of prep work to do. The next two weeks will be all about the soil: Digging into it, testing it, weeding it, and amending it. In addition to containers, I have three main planting areas that I'll focus on this year: BED 1, along the south side of the house; BED 2, along the south side of the garage; and BED 3, along the east side, or back, of the garage (the crude drawing is not to scale, but I will use this basic sketch to start noting plant locations).

In previous years, the only area that I used for edibles was BED 1, along the south side of the house. You'd think that this area would be the easiest to prep, but I was silly to plant invasive bamboo here a few years ago, and these tough guys, along with an overgrown butterfly bush and spreading annual grasses, will make for some backache...and that's just not acceptable on a Monday. So I started with BED 2, the area along the south side of the garage.

The area is nearly a blank slate. About 10 years ago, I planted a neat row of Goldflame Spirea shrubs, but not only have they grown to a not-so-neat state, they do nothing for the vertical space here. It's interesting to note how much larger and healthier the plants are close to the gutter downspout--it's clear that the bushes farther away from it did not get enough water. Before the heirlooms go in, a better irrigation system will be installed.

I dug out all but one out of the Spirea shrubs. I figure that the one adds some visual interest, and, from the front side of the garage, this Spirea has always looked great. Once the garden plans come together, though, it may have to come out as well. While digging, I noticed lots of worms here...that's a good sign.

The bed will be widened yet, and I'll need some stepping stones so the little grass that's in my yard stays put. I'll create a framed-in mesh netting, which will run vertically right up into the roof eaves. This will allow the plants to grow up, not so much out.

The plan for plants in this space (BED 2): tomatoes, for sure, and likely peppers, since the two both thrive in the same soil type. What kind of soil is here, I currently do not know--that is my next task, and one (hopefully) made easy by the handy dandy digital soil test kit brought to me yesterday by the Easter Bunny.

Thursday, April 5, 2012

Digging into .. the History of Cabbage

In honor of the Filderkraut Cabbage being the first of my heirloom seeds to sprout, I decided to look into the history of cabbage ... where the plant originated, and how it got to my region of the world. 

I love cabbage. I'm Polish, and so, of course, kapusta was a regular on my dinner plate growing up--it's an undeniable great partner to pork or kielbasa, and it is delicious stuffed in delicate pierogi dough or piled high on top of a Ball Park frank. About the time when my Filderkraut and Red varieties are ready for harvest, I'll share some favorite recipes.

Cabbage, a member of the Brassica family, has been identified as one of the oldest known vegetables. Stories of ancient mythology have cabbages springing from the tears of Lycurgus, King of the Edonians. Egyptian pharoahs reportedly ate large quantities of cabbage before nights of partying, believing that the vegetable would prevent the ill effects of consuming mass amounts of alcohol.

Cabbage was also loved by both the Greeks and Romans, who used it not only as a food source but for medicinal purposes. Cato the Elder, Roman general and author, praised cabbage for its medicinal properties, declaring: "It is the cabbage that surpasses all other vegetables." He believed that there were great health benefits from bathing in the urine from a person who eats cabbage. Roman philosopher and naturalist Pliny the Elder recommended the juice of the raw cabbage combined with honey for sore and inflamed eyes, among other ailments. People from many cultures have used cabbage leaves to soothe and heal--they have been wrapped around sore throats and placed over swollen breasts of nursing mothers.

Nutritionists praise cabbage for its nutritional value. It is low in calories and high in vitamins--as such, it has become a dieter's dream (remember the Cabbage Soup Diet of the 1980s?). Cabbage is high in vitamin C, iron, and calcium. It has anti-inflammatory properties, has been used to treat ulcers and digestive issues, and is even believed to fight against cancer.

Early cabbage plants were not as we know them today, but were weedy and spindly, more like kale, which is in the same family (as are broccoli and Brussels sprouts). Today's cabbage forms a head, which is the edible part of the plant--it is believed that European farmers developed this adapted version during the Middle Ages. Cabbage was brought to North America in the mid-1500s by Jacques Cartier, and the first written record of it in the United States was from 1669. As it is a cold crop, cabbage is grown primarily in the northern and coastal regions of the United States and Canada.

I chose two varieties of cabbage for my inaugural heirloom garden:  Filderkraut Cabbage and Mammoth Red Rock Cabbage. Filderkraut, also known as Spitzkohl, is an ancient German heirloom that grows in an impressive cone shape, and per Annie's Heirloom Seeds, makes for the best tasting sauerkraut. It's one of the sweetest of cabbages and is supposed to be easy to grate. I plan to use the Mammoth Red Rock, a variety introduced in 1889, in mixed green salads and coleslaw, in its fresh form to best enjoy its crisp texture and sweet flavor.

Sources:

"Cabbage," Gardenology.com, http://www.gardenology.org/wiki/Cabbage.

"Cabbage," Herbs that Heal,  http://herbalsimples.com/cabbage.htm.

"Cabbage: Cabbage History, Cabbage Facts & Cabbage Recipes," http://www.inmamaskitchen.com/FOOD_IS_ART_II/food_history_and_facts/cabbage.html.

"Cabbage Quotes," http://www.foodreference.com/html/qcabbage.html.

Cheney, Garnett, "Rapid Healing of Peptic Ulcers in Patients Recieving Fresh Cabbage Juice," Western Journal of Medicine, http://www.ncbi.nlm.nih.gov/pmc/articles/PMC1643665/?tool=pmcentrez.

Filippone, Peggy Trowbridge, "Cabbage Lore and Legend," http://homecooking.about.com/od/foodlore/a/cabbagelore.htm.

"Nutritional Value of Cabbage," Livestrong.com, http://www.livestrong.com/article/243474-nutritional-value-of-cabbage/.

Salloum, Habeeb. "Cabbage: One of the Most Nutritious Vegetables," Countryside & Small Small Stock Journal, http://www.countrysidemag.com/issues/91/91-4/Habeeb_Salloum.html.

Friday, March 30, 2012

DAY 8: March 28: We've Got Seedlings!

A little earlier than I expected ... eight days after planting my first batch of heirloom seeds, I see green leaves poking through the soil. What has come up first? FILDERKRAUT CABBAGE. Willkommen, my little cuties!

Filderkraut Cabbage, also known as Spitzkhohl, is an ancient German heirloom that was developed for making sauerkraut. According to Annie's, this variety has "huge pointed heads, is very sweet, and makes for an excellent sauerkraut."

The plant is expected to grow to about 28 inches, and the arrow-shaped heads should be about 12 inches tall when ready for picking.

I'm pleased that these came up first, as these are a very long seasoned crop--mature heads aren't even expected for 90-100 days after transplanting them into the ground, which is still a few weeks away.

Also, like most cabbages, they are a cool weather crop and best seeded indoors in early spring so the plants can develop while the temperatures are still cool. I'll try to keep some warmth underneath the soil, and bright light via the sun and/or a grow light above the seedlings until the outdoor temps are warm enough again to harden them off outside for a few hours a day, lengthening the time they're out each day as time goes on, before transplanting them in the ground for the season.

In the last few years, I've started to really enjoy several varieties of cabbage, and in raw and cooked forms. I'm fascinated that cabbage has been around for thousands of years and was loved by the Greeks and Romans. I'll dig into the history of cabbage and post what I find in a few days.

Tuesday, March 27, 2012

Fiddleheads

So the hard freeze last night didn't harm a thing in my yard, and I hope that most Michigan farmers were spared as well.

While I was out surveying my property earlier today (which took all of 3 minutes), I spotted tons of young fern shoots along the cool side of my garage. About three years ago, some loving family members offered up ferns from their overcrowded yard about 10 miles from me, and, since transplanting, the plants have nicely multiplied, as root-and-shoots do.

Ferns are magical this time of year. Their top curly-cue fronds (called fiddleheads) are something out of a Dr. Suess book. No wonder they've become a culinary delight--they're GORGEOUS, and they're packed full of antioxidants. If you're going to eat them, just make sure to clean and cook them properly--eating them raw have caused some illnesses. In fact, some varieties are toxic. Ostrich ferns are the safest to eat. They're usually able to be harvested just two to three weeks in the spring.

Before cooking, be sure to wash your fiddleheads thoroughly, rubbing off any brown coating on the plant. Boil or blanche them with some butter-water, finished with sea salt and pepper. 

Monday, March 26, 2012

'Tis the Season for a Hard Frost

The daffodils are sHiVeRiNg outside. I told the bees to warn the plants: Don't come up out of the ground yet. But last weeks' 80-degree temps coaxed us all out into the sun, I think.

There's a freeze warning in effect for the entire Great Lakes region as well as other areas of the U.S. tonight. It's early evening, and my heirloom seeds are all snug in the house already--and they might get a grow light treatment to boot--but I worry about the early rising flowers and the budding Japanese Maples in my yard. Of course more in trouble could be the mass crops of apples and asparagus and strawberries. Farmers won't sleep well tonight.

Saturday, March 24, 2012

DAY 1: March 20: The First Seeds Meet Soil

It's go time. My nine-year-old daughter and I are working together on this project, and all winter we've been collecting egg cartons. There are a few of the styrofoam varieties but the majority are recycled cardboard, which we will further recycle directly into the ground with our seedlings.


Five varieties of tomato plants went into 3-inch fiber pots, which can also be planted straight into the ground. I love the variety...greek, pink, black, red, cherry.


Each container was labeled (<3 Sharpie <3), and after planting, all immediately went out to sunbathe--it's been record high temperatures in the 80s this week, so our seeds should be off to a dandy start. With it being March in the Midwest, though, we'll have to watch the temperatures carefully. There's a spot ready in the basement for when the outdoor temps drop near the freezing mark, which could very well happen yet.

We'll now fall into a twice-a-day water cycle (a spray bottle is used so the seeds aren't flooded) and anticipate the day that the happy little seedlings poke through the soil. In the meantime, the big shovels will come out to rearrange the yard. There are many shrubs to dig out and plants to move around to make room for our heirlooms. Concerned about the tiny yard, I have been thinking a lot about vertical gardening--these guys are going to need to grow UP...